Continuous warp. Weaving on one side, only.
Hold your yarn at the lower back side of the loom and wrap up and over the first notch, toward the front. Continue through the bottom notch that is directly opposite. Keep wrapping until you have reached the final bottom notch. Pass the yarn through this last notch and turn the loom over.Tie the start and finish ends together, diagonally, across the back of the loom. You are now ready to weave, on the opposite side.
When you are done weaving, turn the loom over, so that notches are to your left and right. Using scissors, cut through the warp yarns, at their midpoint. Trim off the knot that is left from the diagonal tie.
Removing the Cloth
Remove the cloth from your loom and position a fringed side so that it is facing you. If you have used every notch, there should be an odd number of warp yarns. Treat the first two as if they were one: hold them together while picking up the third piece of yarn and tying a "shoelace knot." Gently snug the knot down to the weft. When this is done, tie a shoelace knot again, gently pulling until the knot is firm. Pick up the next two warp yarns and repeat, tying a shoelace knot that snugs the weft, and another to make a firm knot. Do this for all of the warp yarns on one side and then turn your work around and do it for all of the warp yarns on the other side.If the fringe is too long for you, fold your work in half so that both fringes are on the same side. Slide the fringe over the edge of the table until the length you want ends at the bottom edge of the table. Making sure things are all even, hold your work down firmly and use the bottom edge of the table to guide your scissors in a straight line, as you cut the fringe.
Handwash according to the fiber you've used, to full it, or firm it up.
The work at right was done by my 3rd grade students, on 13x13" chipboard looms. They warped the looms themselves and all are first time weavers!
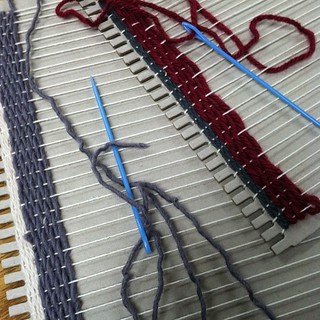
Individual warp. Weaving on both sides.
 | |
| Each warp end tied into a bow |
Take each length and bring it through a bottom notch on the board. Draw the ends up to the notch exactly opposite and tie a bow there. Make all your bows on the same side. Now, you can weave from the bows end, down the loom to the bottom. Add a few extra rows of weft when you reach the bottom notches--you'll need them to fill the slight gap that will result. Turn the loom over and continue weaving from the bottom, up to the bows, at the top. When you are done, untie the knots and unfold your cloth from the loom. Ease the extra rows of weft into balance.
From tying the fringes through fulling, the remaining instructions are the same as those for removing the cloth, above.
Warning:
Never warp a chipboard loom so that the warp is looped around the pegs, as you might with a wooden loom. The tension will break the pegs off.
If you ever do happen to break a peg, go to a coffee shop, have a coffee and save your wooden stirring stick. Bring it home and snap off an inch or so from both ends. Using wood glue, glue one on each side of the peg, with round ends out.
Chipboard Looms can be found at vika.etsy.com