This
country has a mental problem, literally. Math and art are not mutually exclusive entities inhabiting separate worlds, let alone separate hemispheres of the brain.
Both are abstract, symbolic representations of realities that exceed
the bounds of language.
They mediate the too big, too small, and too profound for words.
Wednesday, September 23, 2015
Saturday, May 2, 2015
Letting Math Students Drive the Car
One of the most amazing experiences I had, once I started driving, was getting lost on routes that were very familiar to me. I quickly realized that sitting in a passenger seat and observing whether the route was correct, or not, was not the same skill as driving the car, myself, in the correct sequence.
When I began to have the opportunity to teach regularly, it occurred to me that the same was true of the difference in comprehension behind analyzing questions--and constructing them. I began to ask middle school students to construct test questions, in lieu of answering them, or to create the questions for a unit quiz. I often ask students to work in teams because they teach each other as they demonstrate their individual approaches to completing a task. It's always better to have more tools in the toolbox.
Currently, I'm providing remedial support and enrichment in an after school program funded by the state. During their regular daytime classes, my elementary students are working on learning how to do two part math problems, problems that require two different operational steps. This is what happened this last week.
I teamed students up in threes. We wrote down all the possible pairs of the four operations on the board and I asked them to choose a pair and work together to write their own two part math problem.
Each small group presented their problem to the class for solving, and I wrote the equations on the board, as the class articulated them. We got done, I thought it was enough, especially for the first time and the time of day. It was nearly 5pm! "Nooo!," they yelled out, "This is FUN!" "We want to do MORE!"
So, they wrote more and better. I said that one of the operations had to be multiplication, this time, and this time the team also took over writing the equation, as they presented to the class. They learned quite a bit when the equation would reveal an error in their writing, or a lack of clarity.* They were very creative, including their own names and interests in the problems. I shared with their daytime teachers and their faces lit up--let's try that!
*This is also a language arts assignment that naturally supports the development of detailed and accurate writing, something they are also currently working on.
When I began to have the opportunity to teach regularly, it occurred to me that the same was true of the difference in comprehension behind analyzing questions--and constructing them. I began to ask middle school students to construct test questions, in lieu of answering them, or to create the questions for a unit quiz. I often ask students to work in teams because they teach each other as they demonstrate their individual approaches to completing a task. It's always better to have more tools in the toolbox.
Currently, I'm providing remedial support and enrichment in an after school program funded by the state. During their regular daytime classes, my elementary students are working on learning how to do two part math problems, problems that require two different operational steps. This is what happened this last week.
I teamed students up in threes. We wrote down all the possible pairs of the four operations on the board and I asked them to choose a pair and work together to write their own two part math problem.
Each small group presented their problem to the class for solving, and I wrote the equations on the board, as the class articulated them. We got done, I thought it was enough, especially for the first time and the time of day. It was nearly 5pm! "Nooo!," they yelled out, "This is FUN!" "We want to do MORE!"
So, they wrote more and better. I said that one of the operations had to be multiplication, this time, and this time the team also took over writing the equation, as they presented to the class. They learned quite a bit when the equation would reveal an error in their writing, or a lack of clarity.* They were very creative, including their own names and interests in the problems. I shared with their daytime teachers and their faces lit up--let's try that!
I felt that
constructing their own problems would help them to more easily
distinguish the separate steps and the necessary vs. unnecessary
information in the problems they must solve. It's the difference between
sitting in the back seat, and finally driving the car.
*This is also a language arts assignment that naturally supports the development of detailed and accurate writing, something they are also currently working on.
Friday, April 24, 2015
My Etsy Calculator
 I find it very helpful and thought you might, too. Feel free to download it from the Google docs link, below.
When you download the calculator, you'll find a gray box at the upper left. The numbers in the gray box are supplied by Etsy. You can change any of them, if Etsy increases their listing fees, sales commission, or card processing fees--the calculator will still work.
There are actually two calculators. The first lets you input what you are charging for an item and how much you are requiring for shipping. It will then calculate what your net will be, after fees and shipping are subtracted.
The second calculator allows you to enter the amount you would like to receive for an item and how much you plan to charge for shipping; it then calculates what you should charge in order to receive that net amount, after fees and shipping.
You can check the two calculators against each other. Only the cells that should take inputs will allow your input. There are also a few notes, just click on the small red square at the upper right of any cell that has one, for additional information.
I hope it saves you as much time as it does me!
Etsy Calculator
You'll be provided with an image. Look to the top of your screen for download icon/link.
Monday, March 9, 2015
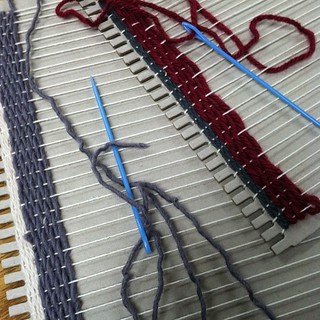
A Third Way to Warp Your Chipboard Loom
In How to Warp a Chipboard Loom, I shared two ways to warp your loom: continuously and individually. The first allows you to weave on one side and the second allows you to weave the entire board, front to back. (Pictures to come.)
Individual warping takes some time. If you want to warp quickly and still use both sides of the loom, there is still another way to warp. If you purchased a prewarped loom from me at Stitches West, in Santa Clara, then you may have a loom warped in this manner.
In this third way to warp the loom, the warp is wrapped continuously around the loom. Normally, this leaves the reverse lacking one warp end. I've modified the looms, by drilling two neat holes at opposite ends. This allows the opposite ends of the warp to be anchored at the back of the loom and creates the missing warp end. It also creates an additional warp end. Whenever you weave, starting on the front, the tail of the additional end will be closest to your work when you turn the board over. Pair that extra with the line of warp next to it and weave over/under them as one. Treat the other end as what it is, a continuation of the end that began on the front of the board, passing over and under it on return, as you weave the back side.
Because this style of warping leaves no extra, you will need to begin weaving at least an inch from the notches, and finish weaving at least an inch from the notches, on the reverse. When you snip the warp, close to the notches, this will leave you just enough to finish the ends of your cloth. If you need longer ends, just begin and end farther from the notches.
When you are done, loosen the two anchored ends of yarn from the board, so that they hang free, and snip your work free from the loom, as close to the notches as possible. You can then trim the two longer ends to the same length as the others.
Chipboard Looms can be found at vika.etsy.com
Tuesday, February 24, 2015
How to Warp a Chipboard Loom
Continuous warp. Weaving on one side, only.
Hold your yarn at the lower back side of the loom and wrap up and over the first notch, toward the front. Continue through the bottom notch that is directly opposite. Keep wrapping until you have reached the final bottom notch. Pass the yarn through this last notch and turn the loom over.Tie the start and finish ends together, diagonally, across the back of the loom. You are now ready to weave, on the opposite side.
When you are done weaving, turn the loom over, so that notches are to your left and right. Using scissors, cut through the warp yarns, at their midpoint. Trim off the knot that is left from the diagonal tie.
Removing the Cloth
Remove the cloth from your loom and position a fringed side so that it is facing you. If you have used every notch, there should be an odd number of warp yarns. Treat the first two as if they were one: hold them together while picking up the third piece of yarn and tying a "shoelace knot." Gently snug the knot down to the weft. When this is done, tie a shoelace knot again, gently pulling until the knot is firm. Pick up the next two warp yarns and repeat, tying a shoelace knot that snugs the weft, and another to make a firm knot. Do this for all of the warp yarns on one side and then turn your work around and do it for all of the warp yarns on the other side.If the fringe is too long for you, fold your work in half so that both fringes are on the same side. Slide the fringe over the edge of the table until the length you want ends at the bottom edge of the table. Making sure things are all even, hold your work down firmly and use the bottom edge of the table to guide your scissors in a straight line, as you cut the fringe.
Handwash according to the fiber you've used, to full it, or firm it up.
The work at right was done by my 3rd grade students, on 13x13" chipboard looms. They warped the looms themselves and all are first time weavers!
Individual warp. Weaving on both sides.
 | |
| Each warp end tied into a bow |
Take each length and bring it through a bottom notch on the board. Draw the ends up to the notch exactly opposite and tie a bow there. Make all your bows on the same side. Now, you can weave from the bows end, down the loom to the bottom. Add a few extra rows of weft when you reach the bottom notches--you'll need them to fill the slight gap that will result. Turn the loom over and continue weaving from the bottom, up to the bows, at the top. When you are done, untie the knots and unfold your cloth from the loom. Ease the extra rows of weft into balance.
From tying the fringes through fulling, the remaining instructions are the same as those for removing the cloth, above.
Warning:
Never warp a chipboard loom so that the warp is looped around the pegs, as you might with a wooden loom. The tension will break the pegs off.
If you ever do happen to break a peg, go to a coffee shop, have a coffee and save your wooden stirring stick. Bring it home and snap off an inch or so from both ends. Using wood glue, glue one on each side of the peg, with round ends out.
Chipboard Looms can be found at vika.etsy.com
Subscribe to:
Posts (Atom)