Showing posts with label buttons. Show all posts

Sunday, December 3, 2017

How to Create Alternative Shanks for Art Buttons

Dark olive green and black button with a center motif: the holes are "pinned" using black beads as anchors.
This button has a shank that utilizes
two black beads.
Your art button already has a design or texture and you don't want to obscure or change it by using standard sewing.

You've probably already noted "self shanks" -- where the hole is through a bump on the back of your button. You may also have come across pin shanks: just like it sounds, a metal pin with head is passed through a single hole, from the front to the back of the button, and bent into a loop.

There's more than one way to create a button shank. 


I've used a single, orange, linen thread so you can see what's going on. I'd recommend multi-strands, if you're sewing -- or a ribbon, if you are familiar with tying buttons onto fiber garments, so that they can be easily removed for washing. You may choose to leave the ends long enough to sew through your garment; you have options.


The thread is passed from the back of the button, through one hole. Then it's passed through the bead, and back through the button hole, to the back of the button. The first bead now forms an anchor pin.


The thread is now passed from back to front, through the second button hole. Then, through the second bead and back through the button hole. Both ends of the orange thread are now at the back of the button: even them out and snug them up. 


Pass each thread under the the loop that was formed in between the holes. You will tie them in a knot, at the middle. When you fold them across each other, to form the knot, you can also fold them over, and capture, any thread that forms the loop between the holes.
A little dot of superglue or fray check won't hurt, to secure the knot.


You might have worked with more than one thread. You have a choice, now. You can use the long ends to attach the button to your fabric, or you can snip them each to about 1/3 of an inch in length, and then, with your sewing thread, sew over the top of them as you attach the button to your garment, sewing through the center loop that you created. 


For more art buttons
vika.etsy.com

Saturday, July 2, 2011

Square Red & Black Porcelain Button


Square Red & Black Porcelain Button
Originally uploaded by la_v_i_k_a

Square buttons...a rarity, and often a collector's item. That's something new, that I just learned, lately. I thought it was interesting and then thought you might be interested in learning something new about bright red glazes.

In the past, red was a dangerous color: cadmium is poisonous. Its glazes could also be finicky and disappointing, burning out at the slightest overheating or affected by copper glazes fuming nearby during the firing, both resulting in a bland unattractive gray. Your work was ruined.

Now, cadmium is encapsulated in zircon (a silicate & a word we get from the Middle East) before being added to glazes. Structurally trapped within zircon and used as a stain, in suspension, rather than as a soluble oxide, it cannot leach (and soak into your dinner salad, in other words!). The result is that you can eat off of bright red dishes, as never before.*

This button combines a metal saturate glaze, on the left (most likely some combination of copper & iron, along with cobalt--It shows a bit blue when thinly applied), with a bright cadmium red. An impossible combination, just a short time ago.

*Just be careful: if you bought that bright red decorated dish abroad, in an unregulated market, it may still be unsafe.

Saturday, June 25, 2011

Button Swap? It's a Snap!

I'm always on the lookout for clothing items that have large buttons, so that I can take them right off!
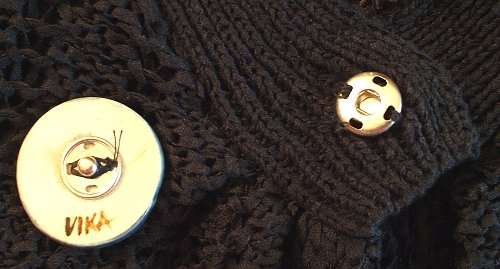
This short-sleeved knit vest originally had a plain, large plastic button for closure, at the neckline.


I removed that button and replaced it with the female half of a large snap. (I now know where to find the same size snaps in black, but fortunately for this posting, these are silver and easy to see against the black knit.)
Having whip stitched the buttonhole closed, I sewed a male snap part to the middle of the backside of the closed buttonhole. At that point, the vest could be snapped together, but had a blank, buttonless front.


Next, I sewed another female snap onto the outside, over the sealed buttonhole.
The last step was to sew a male snap part onto the back of my Dancer button and snap it onto my garment.


Now, by simply adding a male snap part to any of my buttons, I can change outfits at will!

Friday, February 6, 2009

100 Green Buttons


100 Green Buttons
Originally uploaded by la_v_i_k_a

100 Porcelain buttons in the green state.

I started handbuilding with clay years ago and enjoy photography, very much. The processes from both have influenced how I make buttons.

I don't have button molds.

Instead, I roll and texture entire slabs with themes that interest me, then crop small vignettes. Each button is the "same," and yet just a little bit different. They go together without looking like they rolled out of a factory. Each one is unique.

These have already been cut, hand smoothed, drilled, and all edges beveled (including the holes, front and back!). I'm careful to work when the clay is leather hard, not completely dry; it cuts down on dust.

Next? I'll be signing the backs with a paintbrush, glazing, kiln loading, and firing.

I only fire once. It conserves energy.

There are 200 more buttons out of camera range!